

The mind is a funny thing. Some of us (ahem, me) have minds that are very cautious and anxious and will over-analyze every detail down to whether we eat jelly or peanut butter on our toast, because it matters. And others would willingly repel themselves off a cliff or swim to the bottom of the ocean without a second-thought. It’s good that I have people like that around me, though. Because that’s the kind of person that I pretend to be sometimes. It’s the kind of person I want to be sometimes. Not all the time – that is way to stressful. Just sometimes.
Last week, I faced my biggest fear (heights) by basically rock climbing down the side of a cliff, aided only by chains and a few ladders at the bottom. Note: there was no safety net; I was not harnessed in to ANYTHING. What the fuck was I thinking?!
 Before going on the trip to Havasupai, we looked at pictures of the hike down to Mooney Falls. Everyone said it was a Must Do. And the pictures, while scary, didn’t look TOO bad. I figured I would sweat a little, but that it would be like 5 feet of holy shit scary and the rest would be just a little scary. What no one tells you is that no one has taken a picture of the super scary parts of this “hike,” because you are clinging to the side of the mountain wondering where you went wrong in your life and kicking yourself for never even having visited the climbing gym one time before putting your entire fucking life on the line. That being said, the picture below kind of gives you that stomach-sinking feeling.

Take Note: The hike to Mooney Falls is not a stand alone hike. First, you have to get yourself down into Havasu Canyon which is an 8-10 mile hike depending on whether you plan to spend the night at the lodge (8 miles) or in the campground (10 miles). This is not a day trip, and you need to plan ahead as reservations are often booked out a year in advance. Check out my overview of the whole trip into Havasu Canyon here.
Once you’re in the canyon, the hike to Mooney Falls is not far nor is it arduous until you start your final descent. However, after the long hike in on Day 1, we were content to check out Navajo and Havasu Falls which are closer and which don’t require any rock-climbing of any kind. On Day 2, we took our time getting up and ready and headed for Mooney Falls (with lots of water and some food) around 9am.
TIP: In the summer, especially, you will always want to carry a lot of water. Each of us carried 70-100 ounces (in 100 degree heat in June) on our hike to Mooney Falls. Do not rely on your fellow hikers to carry your water – if you get separated from the group, you need your own. The campground has a spigot with fresh spring water that we used to fill up our water reservoirs. Some people bring water filters, but most people don’t bother.
From the campground, it’s only a half a mile to Mooney Falls! We stayed at the lodge, so our hike was a little over 2 miles – but the hike from the lodge passes Navajo Falls and Havasu Falls which allow for refreshing breaks when needed. We didn’t stop on our way to Mooney, but we definitely stopped at both falls on the way back. On our way there, we just wanted to get there as quickly as possible to make sure we beat the heat. It’s hard for me to gauge if we beat the heat or not, though – I was sweating with so much nervousness!
When we reached the top of Mooney, we took a couple of minutes to admire the beauty from the top – and wonder about the tiny little specks of people we could see playing in the pools at the bottom. Oh 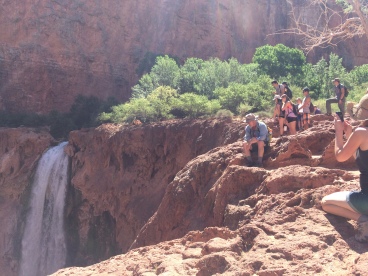 how I wished I was already at the bottom! We nervously chatted with the people around us, all of us wanting someone else to lead the way down the cliff. Where was the trail anyhow? We wandered around the ledge and eventually saw a chain with a warning sign on it. This is it. We cautiously followed a small group of people – one young man was eating his breakfast out of bag – as we followed the switchbacks. I tried not to think about it.
 The first part of the descent is not too bad. The trail is a few feet wide in most places, and you can walk upright (spoiler alert: you will not be standing upright shortly). Right before the trail gets ridiculously scary, there is a picnic table tucked under an overhang of rock. This is a great place to take a breather and try to calm your nerves. I drank more electrolytes, which did make me feel better. We also changed into our swimsuits here. Eventually, though, you have to finish the descent.
There are 2 tunnels on the way down, and suprisingly, I felt safer and more relaxed in the tunnels than at any other juncture on the hike. I had expected the tunnels to be smaller, but most people can walk through them just by ducking a little. After the tunnels, came the chains, and the moment that my heart stopped. I looked down the 80 feet to the bottom and realized that this was going to be a million times scarier than I had expected – and I had known that it would be scary! I took a breath, pushed every thought out of my head, and took ahold of the chain. Breathe. Fucking breathe.
We went down facing forward while holding onto the chains, basically scooting down the cliff on our butts as we found footholds to balance our weight. But we realized later that it might be better to turn around and face the cliff. If you have done this descent before, I would love to know which way you faced!
After making it to a semi-safe spot on the cliff, I nervously asked my dad if anyone was behind us. I figured I was holding up a line. But you needn’t worry about that! Pretty much everyone seems to be at least a little terrified, and regardless, they don’t want to see you fall. Everyone was pretty supportive of each other – and luckily, my sister (who by the way, thought the whole experience was “fun”), was in front of me telling me where she had put her hands and feet at some of the trickier spots. After what seemed like an eternity (but was maybe like 15 minutes?), we made it to the bottom! My first thought was: let’s build a shelter and scavenge for food because I am NEVER climbing back u!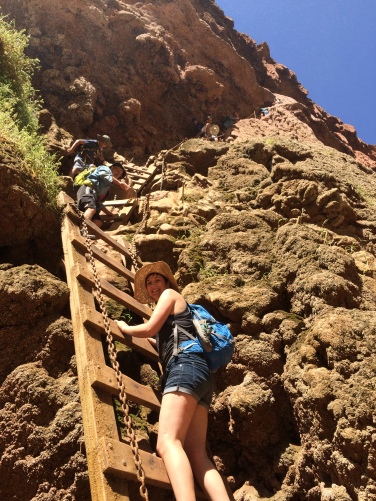
 So of course, everyone wants to know if it’s worth it. Well, if you don’t fall, then for sure! The cool thing about Mooney is that it’s not a one-feature attraction. Near the top, there is a small cascade that has a rope hanging from a tree where you can propel yourself over the small pool below and drop right in. There was a near constant line. I highly recommend that after jumping in the water under Mooney Falls, you follow the river. Every 50 feet or so there seemed to be another waterfall or cascade. And the best part is that you will find a lot more privacy as you wander your way down the river. We were mostly on our own once we got away from the main falls
.

TIP: Water shoes will make this adventure much easier and more fun for you! I highly recommend bringing some – even if they’re just cheap ones, but flip flops won’t cut it. Make sure to wear hiking shoes/boots for the hike down and then change into your water shoes, though.
Some people continue on to Beaver Falls which is another 3 miles down the river. We heard from others that the hike involves a lot of switchbacks across the river, and isn’t totally clearcut and may change from year to year depending on floods and how the river changes. You can’t get lost as you are just following the river, but you may need to do some scrambling. We, obviously, had enough excitement without trying to go on to Beaver. Other crazy people go all the way to the Colorado River which is 8 miles. But you are essentially cutting your own path, and only super experienced and crazy people should attempt it. We did not meet anyone who attempted it.


We played in the water and lounged on small beaches and snoozed in hammocks until the sun disappeared behind the cliff (about 3pm). Many groups seemed to be heading back up at this time, and no groups were coming down, so it made for a great time to go up. Throughout the day, I saw people crossing paths up and down the cliff, and I definitely didn’t want to be the person trying to hang on to the rock while someone was trying to pass me going the other way!
TIP: Since you will want to spend several hours exploring before climbing back up, I highly recommend taking some food. We took some couscous with dried veggies to cook (MSR PocketRocket Backpacking Stove), as well as some tuna and some trail mix. Don’t put your bags too close to the trees, though, the squirrels will rip up your bag trying to get your food!
By the time we were ready to head up, there was a line at the bottom waiting to start the climb. We put our hiking boots back on and followed a group of young kids (seriously, some of them were barely 10) who all did an excellent job of climbing confidently but cautiously.
The climb up was still scary but seemed to go faster than the descent. I really started to gain a little confidence in my ability to scale a rock wall with no safety net! I also gained confidence in the bolts and chains attached the rock. Though at one point, I opted to grab ahold of a rock instead of a bolt or chain because it felt more secure. It felt right. And I felt like a badass rock climber.
As we finished the section of the chains and prepared to go into the first tunnel, my sister stopped to take a picture of the falls. Another person offered to take a picture of all of us, but as my whole body was shaking and still in fear for my life, I hurried onward to safety. I had been brave enough already.
 Foot Note: If you are in average shape and do some training/hiking prior to your Havasupai trip, then you can do this hike. My group ranged in age from 30 up to mid-60’s, and none of us are advanced hikers or climbers. However, I will say, we were incredibly sore after spending 3 days in the canyon!

Leave a comment